Posted: 13 March 2023 | Last modified: 05 July 2023 | Expires: Indefinite
The Meyer Square is a cutting diagram used by fencers to develop flow between strikes, briefly explained by Joachim Meyer in his 1570 fencing book. There are many explanations online that discuss the traditional Meyer Square and how it can be used, but in summary, the Meyer Square instructs a practitioner to strike to the four openings (two upper and two lower) in a given sequence, and then repeat the sequence in different orders three more times.
Some HEMA folks built on the traditional Meyer Square to develop unique sequences exploring striking flows. I’m calling these diagrams swordsquares because though they’re based on the Meyer Square, they’re sufficiently different from the original Meyer Square, and they have applications in non-HEMA arts where using the “Meyer” monicker raises unnecessary questions. When someone refers to the Meyer Square, they’re typically thinking of the common version of the diagram, with only four targets and four sequences. In contrast, I consider swordsquares more generic cutting diagrams in roughly the same format as the Meyer Square, coming in a wide variety of sequences (one sequence per diagram).
Some time ago, I came across a couple such diagrams, and inspired by the idea, I developed my own format for swordsquares. My version of the diagram has nine targets: the four openings from the Meyer Square, a centerline target, a top and bottom vertical target, and two mid-targets on either side. I settled on a sequence of five targets per swordsquare, because I feel this offers the broadest use for a single diagram; five targets is a good but not overwhelming number for use in a flow drill, and fencers can optionally use less actions in the sequence to practice combinations and feints.
So, a given swordsquare wil have five numbered circles indicating the order to attack, and to which opening the respective attack should land. While most targets on the swordsquare can be attacked via a cut or thrust, the centerline target is always attacked with a thrust. This is indicated by a small black dot added to the bottom of the centerline circle. For some swordsquares, a similar dot is occasionally added to a random opening to specify that a thrust is required at that location, which tends to change how the swordsquare is followed because it forces the fencer into a more constrained attack. Optionally, fencers can ignore the thrust indicator if they only want to focus on cuts.
Locations intended to be struck with cuts are sometimes also inverted - the background is black and the number is white. This indicates the target should be attacked with the short/false edge of your sword. Beginners may opt to ignore this, and just stick to using long/true edge cuts, and more advanced fencers may opt to include false edge strikes wherever they make sense (not just where indicated).
Most people will use a swordsquare as a flow drill to move from strike to strike, and play with the transitions between them to find what’s most efficient. Because the swordsquare prescribes the openings to attack to, it may force you to attack openings you otherwise might not be inclined to because of some ingrained preference.
While you can certainly use a swordsquare with no footwork in mind, I find it more interesting to play with footwork between attacks. Many people will take advancing steps with each attack, while others will alternate between advancing and retreating footwork, add in offline footwork, or play with other footwork patterns.
Clubs can use a swordsquare as a discussion prompt: come up with the footwork requirements for a given swordsquare (e.g. all passing steps forward), and then compare the solutions everyone came up with. What transitions work better? Why did someone choose their solution? What changes when the footwork changes?
Other advanced uses of the swordsquare may be to include alternating strikes and parries, such as treating odd numbers as attacks, and even numbers as incoming attacks you need to defend against. Instructors can potentially use this format to develop paired drills outside of the sequences they’re otherwise used to.
If you’ve found other fun uses for the swordsquare format, please let me know, as I’d love to incorporate it and note it here.
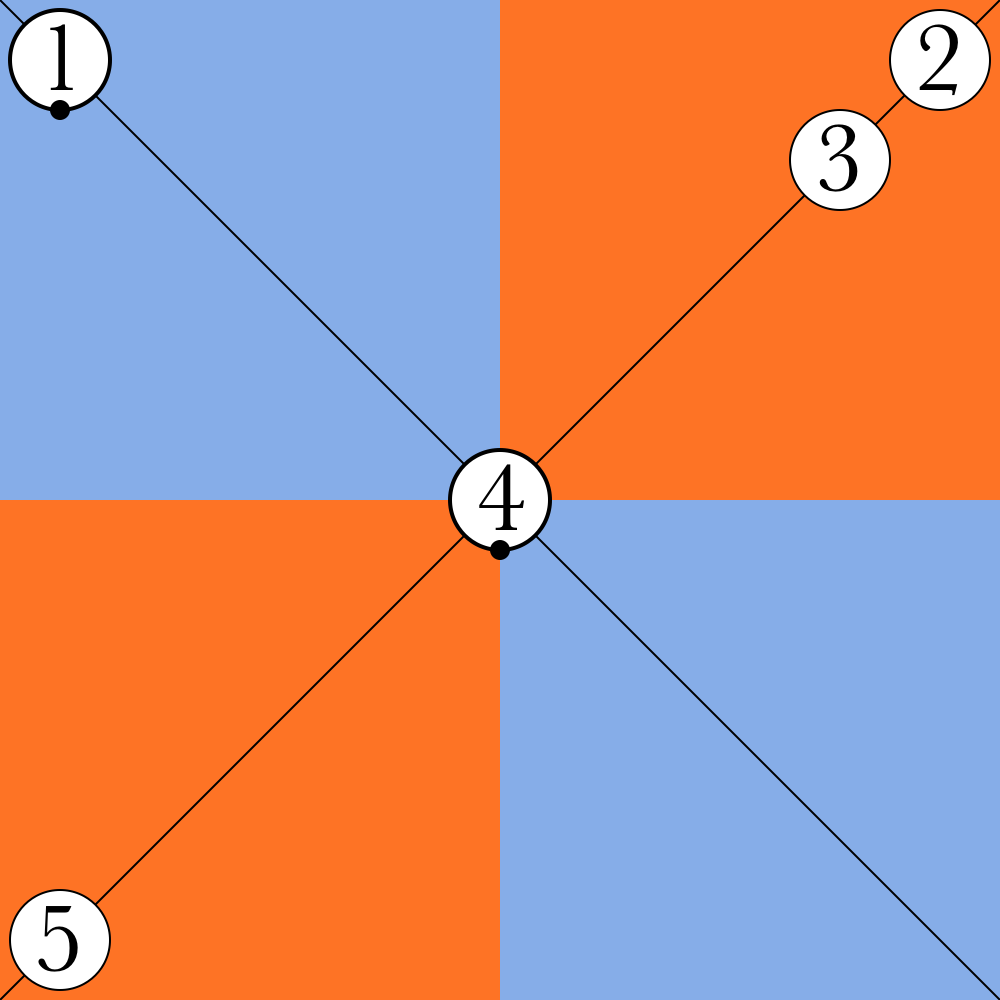
The below picture illustrates the general design of a swordsquare. I’m not going to try to optimize the sequence for it, but will instead talk about one possible option.

In this diagram, the first opening to attack is the upper left opening. Because it’s marked with a dot on the bottom of the circle, it indicates a thrust is required here. So, you may want to begin your drill by beginning in a low left guard, and thrust to your opponent’s shoulder.
The second opening to attack is in the top right quadrant. As there’s no special signifier here, you can cut or thrust to this opening. Withdraw from your previous thrust to a high right guard like shoulder Vom Tag (Posta di Donna), and cut with a high horizontal strike to the head with something like a right Zwerchau or Mezzano.
The third strike is to the same opening, so after your horizontal strike finishes, bring your sword back around to a high right guard, but this time cut down with a Zorn (Mandritto Fendente) to the opponent’s jaw.
Strike four is a centerline attack - the expected thrust indicator is a reminder. Stop your cut halfway, and transition to a thrust here (e.g. Zorn Ort).
The fifth strike is to the lower left quadrant. You can disengage from your thrust, and immediately transition to an Unterhau (Sottano) to the opponent’s leg or hand. Immediately establish cover, and retreat from the engagement.